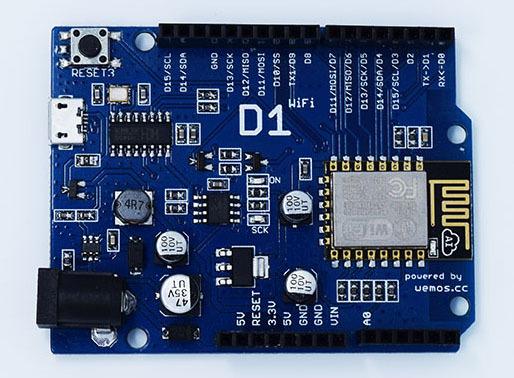
In this example we will connect a DHT11 sensor to our Wemos D1, we will then send the temperature and humidity values to thingspeak.

DHT11 digital temperature and humidity sensor is a composite Sensor contains a calibrated digital signal output of the temperature and humidity. Application of a dedicated digital modules collection technology and the temperature and humidity sensing technology, to ensure that the product has high reliability and excellent long-term stability. The sensor includes a resistive sense of wet components and an NTC temperature measurement devices, and connected with a high-performance 8-bit microcontroller.
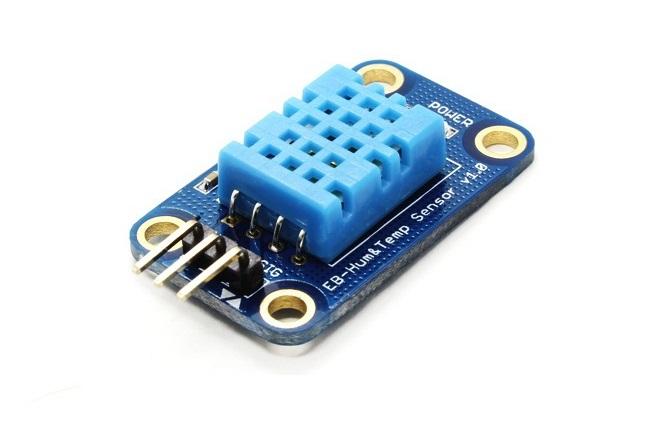
Typically a DHT11 can be bought in a basic breakout board format but can be bought as a standalone part as well, here is a picture of a typical breakout board, this board holds the sensor and a resistor, the resistor is connected between Vdd (3v3) and the signal pin on the board.

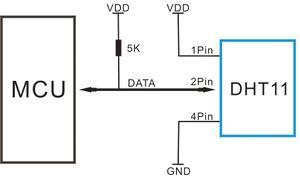
If you do not use a module like the one aboveyou can build a similar circuit on a breadboard. Here is a typical schematic, which is basically what the breakout above actually is

You will connect the Gnd of the module (DHt11) to a Gnd on your Wemos board, connect 5v or Vdd of the module (DHt11) to a 3v3 connection on your Wemos and the Sig pin (data pin on the DH11) goes to whatever input you decide to use on your Wemos, in the code below you can see this as
#define DHTPIN 2
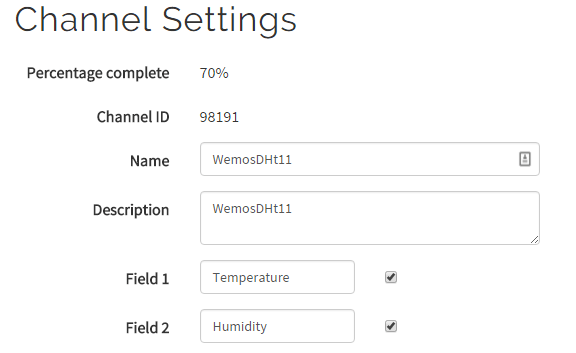
You will now need to create a new account at thingspeak – https://thingspeak.com. Once done create a new channel and add two new fields, one will hold the temperature reading and the other will hold the humidity reading from our DHT11. This should look something like this

Parts List
Here are the parts I used
| Name | Links | |
| Wemos Mini | ||
| DHT11 | ||
| Connecting cables |
Code
You will need an api key from thingspeak.
#include <DHT.h>
#include <ESP8266WiFi.h>

// replace with your channel’s thingspeak API key and your SSID and password
String apiKey = "thingspeak api key";
const char* ssid = "ssid name";
const char* password = "ssid password";
const char* server = "api.thingspeak.com";

#define DHTPIN D2
#define DHTTYPE DHT11

DHT dht(DHTPIN, DHTTYPE);
WiFiClient client;

void setup()
{
Serial.begin(115200);
delay(10);
dht.begin();

WiFi.begin(ssid, password);

Serial.println();
Serial.println();
Serial.print("Connecting to ");
Serial.println(ssid);

WiFi.begin(ssid, password);

while (WiFi.status() != WL_CONNECTED)
{
delay(500);
Serial.print(".");
}
Serial.println("");
Serial.println("WiFi connected");

}

void loop()
{

float h = dht.readHumidity();
float t = dht.readTemperature();
if (isnan(h) || isnan(t))
{
Serial.println("Failed to read from DHT sensor!");
return;
}

if (client.connect(server,80)) {
String postStr = apiKey;
postStr +="&field1=";
postStr += String(t);
postStr +="&field2=";
postStr += String(h);
postStr += "\r\n\r\n";

client.print("POST /update HTTP/1.1\n");
client.print("Host: api.thingspeak.com\n");
client.print("Connection: close\n");
client.print("X-THINGSPEAKAPIKEY: "+apiKey+"\n");
client.print("Content-Type: application/x-www-form-urlencoded\n");
client.print("Content-Length: ");
client.print(postStr.length());
client.print("\n\n");
client.print(postStr);

Serial.print("Temperature: ");
Serial.print(t);
Serial.print(" degrees Celsius Humidity: ");
Serial.print(h);
Serial.println("Sending data to Thingspeak");
}
client.stop();

Serial.println("Waiting 20 secs");
// thingspeak needs at least a 15 sec delay between updates
// 20 seconds to be safe
delay(20000);
}
Results
If you login to your thingspeak account you can view live channel data


Hi!
I’m new in Arduino programming and I try to make wemos sensor data, but i have KY-015 whit dht11 sensor, but vhen I connect it and upload your code it cant read from sensor. Can you help me whit changes in sketch that I need to make?
Thanks!
In the ARduino IDE, when you open the Serial monitor at 115200 do you see any output. The Serial.print lies are effectively only useful for debug. The key one is Serial.println(“Failed to read from DHT sensor!”);. All I could recommend is that you double check your wiring in particular the data connection which in this case is the pin with the S beside it
Above code is not working please help, your code runs very well before some days, but currently not working, pls help, thanks
How does the connection between the DHT11 and Wemos D1 look like?
I’ve added in some info about the DHT11 which will hopefully help
Hello,
After replacing:
#define DHTPIN 2
in the code with
#define DHTPIN D2
all started to work perfectly!
Thanks, dodgy typing updated
Mine is now compiling fine withouth the “D”.
As D4 i am getting compile error.
Any idea where I find the Board driver for the old rev of this board you pictured in this post ?
All I can find is reference to rev 2 ?
I looked on the WeMos site and it no longer appears there.
Thanks
I think you are looking for https://github.com/wemos/wemos.github.io/tree/master/downloads for the CH340 driver
I was told that ESP8266 works only with 3.3v and GPIO may not be 5v tolerant. Are you sure that DHT11 pin#1 is connected to 5V?
Correct, it should have been 3v3 for Vdd
[…] Ahora toca el programita que hay que subir. Tendremos que cambiar el pin donde conectamos el dht, en mi caso he usado el D5, (no olvidar sustituir el 2 por D5, no vale solo 5). Además hay que añadir la api key de thingspeak y el usuario y contraseña de tu wifi. El programa que me ha funcionado lo he sacado de: http://www.esp8266learning.com/dht11-sensor-data-to-thingspeak-using-a-wemos-d1.php […]
[…] Ahora toca el programita que hay que subir. Tendremos que cambiar el pin donde conectamos el dht, en mi caso he usado el D5, (no olvidar sustituir el 2 por D5, no vale solo 5). Además hay que añadir la api key de thingspeak y el usuario y contraseña de tu wifi. El programa que me ha funcionado lo he sacado de: http://www.esp8266learning.com/dht11-sensor-data-to-thingspeak-using-a-wemos-d1.php […]
Hi, I need help..
warning: espcomm_sync failed
error: espcomm_open failed
error: espcomm_upload_mem failed
error: espcomm_upload_mem failed
on log.. what’s wrong? :/
Some things to check
Are you using the correct com port in the Arduino IDE for the board
If you disconnect any external devices connect to the device does the upload work then?
Try another USB cable – I have had issues with cheaper and nasty ones (its not common though)
If you had another board you could try that with nothing attached.
Basically you are just ruling things out – incorrect settings, power issues, faulty hardware
Okay I fixed that, but now
Failed to read from DHT sensor 😀
what PIN on DATA must be plugged?
Connected to D2 of the Wemos
Hi, okay I know I’m so annoying but, I changed dht11 for dht22 they are more accur..
But now, in log:
Connect to: Applepen
……
Wi-Fi connected
Exception (0):
epc1=0x40106da9 epc2=0x00000000 epc3=0x00000000 excvaddr=0x00000000 depc=0x00000000
ctx: cont
sp: 3ffef650 end: 3ffef880 offset: 01a0
>>>stack>>>
3ffef7f0: 0000ffff 00ffff00 3ffee6ac 40203966
3ffef800: 3fffdad0 00000000 3ffee6ac 402039bc
3ffef810: 7fc00000 00000000 3ffee6ac 40202426
3ffef820: 3ffe8580 3ffe8360 3ffee824 40203d88
3ffef830: 3fff018c 40202edc 3ffee824 40203dac
3ffef840: 3ffe8364 3ffee728 3ffee824 40202375
3ffef850: feefeffe feefeffe feefeffe 3ffee850
3ffef860: 3fffdad0 00000000 3ffee848 4020455c
3ffef870: feefeffe feefeffe 3ffee860 40100718
<<<stack<<<
ets Jan 8 2013,rst cause:2, boot mode:(3,6)
load 0x4010f000, len 1384, room 16
tail 8
chksum 0x2d
csum 0x2d
v60000318
~ld
and then again, and again.. it can be some problem with router? I used router for Xiaomi, but now I have Linksys wrt54gl.
but anyways.. thank you for any help 🙁
Change:
#define DHTTYPE DHT11
with
#define DHTTYPE DHT22
Seen this on the wemos forum
As a solution I put:
WiFi.persistent(false);
in the beginning of setup() and lo-behold!! Crashes no more!
Hello guys… this was my first project with the wemos and I woundering how to do an offset on the sensor.
The sensor is showing way off the real temperature so I whant to calibrate it with an offset.
What DHT-library did you use? The one I have installed has got a file named dht.h instead of DHT.h. After I have changed the sketch at 2 lines (“#include ” and “dht dht(DHTPIN, DHTTYPE);”), I got these errors:
Blink:11: error: ‘DHT11’ was not declared in this scope
#define DHTTYPE DHT11
^
/tmp/arduino_modified_sketch_951828/Blink.ino:13:17: note: in expansion of macro ‘DHTTYPE’
dht dht(DHTPIN, DHTTYPE);
^
etc.
Thank you!
Sorry, I did’t read the page.. With the DHT sensor library from Adafruit lib version 1.3.0 installed I get the error that he cannot find file “Adafruit_Sensor.h”.
Thank you!
Now I got the libs working (2 folders “Adafruit_Sensor-master” and “DHT-sensor-library-master”). I have gotten “Failed to read from DHT sensor!” and “fatal exeption”. Do you have a sketch without wifi/thingspeak that I can try? Thanks.
#include
#define DHTPIN D2
#define DHTTYPE DHT11
DHT dht(DHTPIN, DHTTYPE);
void setup()
{
Serial.begin(115200);
delay(10);
dht.begin();
}
void loop()
{
float h = dht.readHumidity();
float t = dht.readTemperature();
if (isnan(h) || isnan(t))
{
Serial.println(“Failed to read from DHT sensor!”);
return;
}
Serial.print(“Temperature: “);
Serial.print(t);
Serial.print(” degrees Celsius Humidity: “);
Serial.print(h);
delay(1000);
}
Sorry I didn’t add a reply (see below for my first reaction). In the meantime I noticed that “D2” doesn’t work for my, neither does “2”. I have to use “5” (and put the wire in connection “D15/SCL/D3”). With this change I shall try your sketch again tomorrow.
The values for temperature en humidity are both too low, resp. 2 degrees celcius and 20%. Is there a simple solution for that?
It works! Just with the “5” (and put the wire in connection “D15/SCL/D3”) instead of the “D2”. Now only the values for temperature en humidity are both too low, resp. 2 degrees celcius and 20%.
Thank you for your answer. I have already gotten that working, but that output is not on a homepage. (My pin 1 and 2 are switched just like on http://www.circuitbasics.com/how-to-set-up-the-dht11-humidity-sensor-on-an-arduino/) Something like this works, even the wifi part: http://www.esp8266learning.com/wemos-webserver-example.php. But now I have to add the DHT11 sensor to the sketch and I don’t know how.
to René Marchal thanks for the D2 tip
I was all over google looking for an answer 🙂
D2 CHANGE TO D5
Thanks for this good example. I’ve made it and also adapted it to use the deepSleep mode for conserving energy. Needs some modifications, but works nice.
Hi,
Thanks for the tutorial !
Where can be found the file DHT.h ?
I cannot compile because I don’t have this file.
You need this – https://github.com/adafruit/DHT-sensor-library and since Adafruit updated some of their Arduino libraries – https://github.com/adafruit/Adafruit_Sensor
You can find these in later Arduino IDE versions – Sketch -> Include Library -> Manage Libraries and then search for the pair of them and install them
Hi. I’m using Wemos D1 mini and Wemos DHT shield. It shows me wrong temperature and humidity. I’ve set it to DHT11, but it don’t shows real values. It’s just a little bit.
About 5°C and 20% humadity.
I am using a D1R1 board, same as pictured above, but am unable to make this work on D2, although I can make it work on D5. I tried an even simpler program, doing a digitalRead on pin 2 (with D2 tied to a pushbutton to ground and a pullup resistor) and it seems to read the value at boot, but doesn’t show changes. Same for D3.
I’m compiling with board set to WeMos D1(retired).
Any thoughts on what’s going on?
Hi
On my serial port everything is fine (connection + data). But there is no plot on my thingspeak account live channel data.
What to do , Thanks for help
have you used the write api code from things speak mate? i used the wrong one and it didn’t work.
Thanks for this mate it works perfectly, the only thing i had to change was the ssid name/password and the D2 pin to D8 (one im using for the dht11). Massively appreciate it, hope you’re still creating!
after the compile, the error message as follows. What is wrong?. Please help…
In file included from d:\Arduino\libraries\DHT_sensor_library\DHT_U.cpp:22:0:
d:\Arduino\libraries\DHT_sensor_library\DHT_U.h:25:29: fatal error: Adafruit_Sensor.h: No such file or directory
#include
^
compilation terminated.
Multiple libraries were found for “DHT.h”
Used: d:\Arduino\libraries\DHT_sensor_library
Not used: d:\Arduino\libraries\Grove_Temperature_And_Humidity_Sensor
Using library DHT_sensor_library at version 1.3.0 in folder: d:\Arduino\libraries\DHT_sensor_library
Using library ESP8266WiFi at version 1.0 in folder: C:\Users\AppData\Local\Arduino15\packages\esp8266\hardware\esp8266\2.4.1\libraries\ESP8266WiFi
exit status 1
Error compiling for board WeMos D1 R2 & mini.
Did you add the Adafruit Sensor library as well its required for some of the adafruit libraries nowadays
Hi, Please Help me
I have tried this code with WeMos D1 R2 and all I am getting is “Failed to read from DHT sensor!”
My DHT11 sensor is working well for Arduino UNO board but fails on WeMos D1 R2, please help me to fix this issue
Great example! It took me 5 minutes to register at thingspeak.com and 5 minutes to upload the code into my Wemos D1; little change – DHT22 insteasd of DHT11 as the latter is not so accurate. Thanks a lot + wishes for new creations!
Agree on the DHT22 – personally the SHTXX or BMP range of sensors I find to be better generally for projects.
Hello!
For a school project we need to get data from a temperature/humidity sensor (DHT11) and a dust sensor written to a SD card. Our group like to go further so we bought the Wemos and make it upload the data from the DHT11 to thingspeak to our own website.
We got it to work, but we can’t get the dust sensor to work correctly, it’s a Shinyei PPD42. We can’t get the script working correctly.
Can anybody help us?
Thanks in advance!
[…] DHT11 sensor data to Thingspeak using a Wemos D1 […]
[…] D1 WiFi UNO R3开发板基于ESP8266 ESP-12N F 模块,够自于淘宝。初步使用WeMos D1的代码如下(WeMosTest)。需要注意的地方包括:1)采用DHTesp或者DHT库应该都是可以的。2)连接A0口获取不到数据,连接D2口可以获取到相应的DHT11的数据。参考链接[1]。 […]