Ok, I had heard of Simba OS but hadn’t managed to try it, as quoted “2Simba is an RTOS and build framework. It aims to make embedded programming easy and portable”
I found a Node MCU board to play about with, so lets crack on.
Install it
Install Simba in the Arduino IDE 1.6.10+ as a third party board using the Boards Manager.
Open File -> Preferences.
Add this URL to Additional Boards Manager URLs and press OK.
https://raw.githubusercontent.com/eerimoq/simba-releases/master/arduino/esp/package_simba_esp_index.json
Open Tools -> Board: … -> Boards Manager… and type simba in the search box.
Click on Simba by Erik Moqivst version x.y.z and click Install and press Close.
Open Tools -> Board: … -> Boards Manager… and select one of the Simba boards in the list.
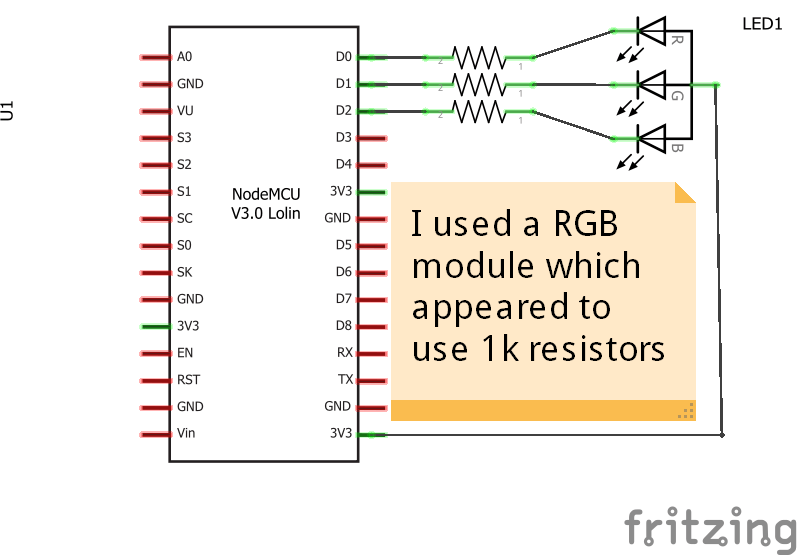
In the example below its a common anode RGB led connected to D0, D1 and D2. Another thing to note there are 4 URLs that can be added but the assumption is that you just want the ESP8266 one. If not they are
https://raw.githubusercontent.com/eerimoq/simba-releases/master/arduino/avr/package_simba_avr_index.json
https://raw.githubusercontent.com/eerimoq/simba-releases/master/arduino/sam/package_simba_sam_index.json
https://raw.githubusercontent.com/eerimoq/simba-releases/master/arduino/esp/package_simba_esp_index.json
https://raw.githubusercontent.com/eerimoq/simba-releases/master/arduino/esp32/package_simba_esp32_index.json
Schematic

Code
Fairly basic stuff, I though about using the pin_toggle function but just went for writing 0 and 1 out
Being a common anode RGB led I wanted it switched off to start with hence the pin_write(&led1, 1) , if you have a common cathode type you would obviously set this to 0 instead
[codesyntax lang=”cpp”]
#include "simba.h"

int main()
{
 struct pin_driver_t led1;
 struct pin_driver_t led2;
 struct pin_driver_t led3;
 /* Start the system. */
 sys_start();

 /* Initialize the LED pin as output and set its value to 1. */
 pin_init(&led1, &pin_d0_dev, PIN_OUTPUT);
 pin_init(&led2, &pin_d1_dev, PIN_OUTPUT);
 pin_init(&led3, &pin_d2_dev, PIN_OUTPUT);

 pin_write(&led1, 1);
 pin_write(&led2, 1);
 pin_write(&led3, 1);
 while (1) {
 /* Wait half a second. */
 pin_write(&led1, 0);
 thrd_sleep_ms(500);
 pin_write(&led1, 1);
 thrd_sleep_ms(500);
 pin_write(&led2, 0);
 thrd_sleep_ms(500);
 pin_write(&led2, 1);
 thrd_sleep_ms(500);
 pin_write(&led3, 0);
 thrd_sleep_ms(500);
 pin_write(&led3, 1);
 }

 return (0);
}
[/codesyntax]
Upload the sketch and all going well, flashy RGB led
This is a basic baby step using Simba OS, I recommend looking at http://simba-os.readthedocs.io/en/latest/index.html if you want to know more

